Pages

Showing posts with label Tools. Show all posts

Monday, May 12, 2014

Heading out

This week I will be participating in the Wayne Plein Air art festival in Wayne, PA, and the first order of business is to cram everything I might need into something that is portable….and light enough that I can actually lift it. No small task.

So after stripping everything down to the bare essentials I have two bags. One for pastels and one for watercolors. I will pick which one I want to use at the beginning if each day and head out. I am rather proud of how small a space it takes up. Watercolor is on the left, Pastel on the right, and the tripod that I will use for both in its bag in the center.


Well….ok….It doesn't show the umbrella I will take for shade, or the wheely crate in case I have to do a lot of walking around town, or the folding chair (in case I want to sit down), or extra plastic bags in case it rains (which it is supposed to), or my big floppy hat, sunscreen, plastic poncho (rain again), rope and or bungie cords for tie downs, drawing and sketching materials, and a bag lunch and water, and first aid kit.


Oh yeah….I forgot about the framing materials. All paintings must be framed and ready for hanging before they are judged. So I must take frames, glass, mats, backing, and all tools it takes to put it all together on the spot.

I guess it's good that I drive an SUV………

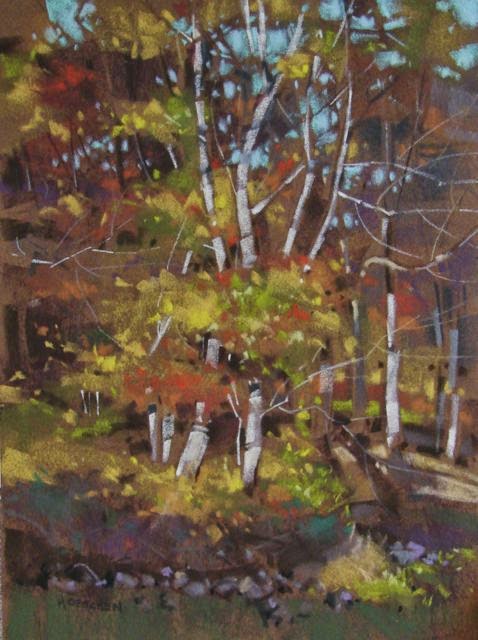
Here's the reason I go to all this trouble.

"Dancing Birches"    9x12     pastel on sanded paper


Wednesday, August 3, 2011

Framing: this Artist's Bane

Wall of frames: be afraid, be very afraid......


Why can't someone invent a Universal Frame? I'm not talking about size. I'm talking about a frame that looks good on whatever style of artwork you put it around and doesn't cost an arm and a leg! Perhaps the only part I hate about painting is having to frame the thing. And yet I know that if you choose the wrong frame you can effectively kill a painting, so care must be taken.

When I was in college I often just "stripped" the paintings (nailed thin strips of wood to the outer edges). It was cheap, I could do it myself, and it went fine with the strange, abstract, and odd things we were required to create in order to get that degree. But the kinds of things I am doing now need more than that, and I would rather be painting than sawing and nailing frames together.

Custom framing (even with my 60% off coupon) is out of the question, so I haunt art stores looking for frames on sale and comb the internet (always a risk since you can't actually touch the frame and computer colors can lie). I also recycle frames that I already have. Paintings of the same size going to competitions at different times can wear the same frame, but for a big show where all your works are exhibited this doesn't work. Right now I have approximately 25 paintings sitting around waiting for a frame of their own.

My latest foray has been to frame my painting, "Heart of the Mill", that is off to a competition. It was the usual agony and the results were only adequate, I couldn't afford spectacular.

I have no solution except to soldier on. But if someone ever invents a Universal Frame they should get in touch with me. I'll buy a few!!

Thursday, June 2, 2011

Wonderful Day....Epic Fail!

 Visited Trexler Nature Preserve in Schnecksville, PA, the other day and had a glorious time tramping along their well maintained trails and taking photos for future reference. I will definately be going back!

There are miles and miles of hiking and horseback riding trails that offer unlimited scenery and are rated "easy", "moderate", and "hard" (this is so that I, a novice hiker, won't wander onto the wrong path and wind up missing for days as I try to crawl back to civilization along a trail nicknamed "Death March").

The weather was spectacular and I thoroughly enjoy my hours in the woods. I even stopped to do a quick little painting, but the results were less than stellar (hence the phrase "epic fail" in the title).

Trexler Nature Preserve in PA.

I parked myself on the edge of a field, dragged out all my gear and went to work.


Here's what I saw.

My set up. The pochade box is the one I made (instuctions here).

A quick blocking out of the shapes.

First lay in of color.

After one hour.

I set a deadline of one hour for myself because I have a tendency to pick at things and get too tight too soon. Choosing such a short time frame forces me to loosen up and cover more ground, faster.

But, after and hour I was very unhappy with what I had. In the distance I could see a couple of hikers coming up the trail, so rather than answer questions and try to justify a poor painting (not sure why I should care what they think, though), I just packed up and started back.

What went wrong? I think I had two main problems. I should have seen it then, but when you work outside you have to think on the fly and that is something that gets easier with practice.
Not enough value contrast : next time I will bring a medium that speeds drying. That way the colors will not sink into each other and I will be able to more easily show contrast.
Not enough color variation : green, green, and more green!! Yes, there really was a lot of green out there, but I should have used a little artistic license to change those colors and add interest and depth.

So that's my analysis. What do you think?


Thursday, May 26, 2011

En Plein Air

  This year I am exploring painting en plein air -"in the open air".

During the 19th century, when painting light became important to several schools of artists, there was a surge in the number of artists painting outdoors. Monet, Pissaro, Renoir, and other impressionists all advocated painting on the spot and the invention of tubed paints freed up artists from having to grind all their own pigments on the spot, causing an explosion in popularity. In America the plein air tradition is going strong and with new designs of portable easels and pochade boxes it is easier than ever to pack up your paints and head for the great outdoors. I made my own pochade box last month.


                                                           Painters painting painters painting outdoors.....huh?


But lest you think that all is sweetness and light, check out this hilarious (but so true) video made by a plein air artist during a painting excursion in the Sierra Nevada Mts http://blip.tv/lipking/adventures-in-plein-air-painting-1438969

Regardless of the mayhem that may result, I will be out there and writing about it in future posts.

Tuesday, April 19, 2011

Something to do on a Rainy Day

A rainy day yesterday, dark and dreary. What to do? How to lift my spirits? A trip to the art store always works, and Dick Blick is having a sale!


Never discount the ability of wandering up and down aisles filled with tools of the trade to energize you and raise those sagging spirits.

Sometimes just seeing all the different supplies can give me ideas.

I am apt to visit the many online stores and find it quite helpful to search their pages for the best deal, but there's nothing like being able to pick up that brush, run your finger across the bristles to see how much spring there is in them, and feel the total balance in your hand.

My visit was fruitful and I came home with some oils, a brush (or two) and a watercolor pad to try out.

Not a bad day after all!

Thursday, April 14, 2011

How to Make a Plein Air Pochade Box

Many say that there is nothing like the immediacy of painting en plein air ( outside, in the open). So, I'm gonna try it! I have painted outdoors a few times, but this year as I work to get my painting skills back I'm going to spice it up by packing up and heading out into the great outdoors on a regular basis.

Okay, okay...... so maybe at first I am just going to walk down the road a bit, but still, it IS outside.

First I need the proper equipment and that means a pochade box. A pochade box is a paintbox that is an easel, palette, and canvas carrier all rolled into one. Traditional pochades boxes are much smaller than a french easel.

OMG!! I went online and those suckers average $150 -$350 !!!  Take a look at these pochades.
Beautiful, but I can't afford them.

So, I've decided to gather up supplies and make my own. Won't be nearly as nice, but if it's functional that's  what I need.

Step 1: I'm off to Michaels with a 40% Off Coupon to buy a simple, light wooden box. 

Here's what I wound up with. It measures 9" x 12" x 3 1/2"(outside dimensions) and is unfinished.

Not very rugged....yet!


I rubbed in three coats of boiled linseed oil to help protect the wood.


Step 2: Add wood slats to make a "shelf".


I glued two slats, shorter than the depth, to each side so that I could later sit a tray on top of them. The slats will keep the tray from touching the bottom, which will be serving as my palette. I don't have to scrape my palette when done. I just close everything up and walk away.


Step 3: Replace the hinges.
 

The hinges were flimsy things, so the next thing I did was buy three sturdy hinges and add them to what was there. The old hinges weren't even screwed in, they were just punched in like big staples.


Step 4: Create the palette area.

I cut a piece of plexiglas and piece of white watercolor paper the size to fit exactly into the bottom (hard to see the plexi in the photo).

Then I cut plexiglas for each side, the height of the shelf.


The white paper goes into the bottom, then the plexiglas goes on top. Then I set each of the side pieces in it's spot.

Now the secret: I ran silicon aquarium sealant around all the seams to make it waterproof and hold it in place. Now I can squeeze out my oil paints directly into the bottom of the box, use it as a palette, and clean the center with the wipe of a cloth! But you can leave the paint that you squeezed out around the edges.


Step 5: Now, off to the hardware store for latches (one for each side) and a hinge to hold the lid in position so that I can lean a canvas against it. Also nuts bolts and washers to attach the handle.


The screws that came with the latches poked through the wood on the inside, so I will use my trusty Dremel with a cutting tool to cut the points off.


Step 6: Create a handle of some sort. Hmmmmmn.....what do I have lying around?

I took a flat, nylon dog leash, cut it to size (melt the cut edges so they won't unravel) and fold the ends under about an inch.

With my Dad's old soldering iron I melted a hole through the nylon at both ends and after drilling a couple of holes through the box, I used nuts, bolts, and washers to attach the strap to the box (the washers distribute the pressure and make it less likely to pull through).

Step 7: Make a tray.
Using foam core (carefully cut), glue (I used E-600), and some white duct tape for waterproofing I make a tray to hold supplies and cover the palette area beneath. We used to make things out of foam core all the time in my college art classes.

The only thing I am missing is the hinge (store didn't have the right size), so that the back lid can be used to lean my canvas against. I'll get that next time I'm out.


Finished!


And I'm so happy with the way it turned out I may make another for my watercolors!

Box (main expense), hardware, sealant, plexiglas, etc. all wound up costing about $35.

Tuesday, March 22, 2011

Goodbye Kolinsky Sables

Disaster strikes!

My expensive sable watercolor brushes, that I scraped and saved so long to buy, are dust. Who would have thought that I really SHOULD have put mothballs in with them. Or maybe it was mice.
Anyway, when I picked them up (memories washing over me) the hairs disintegrated and I was left holding a bunch of metal tipped sticks!
Since I began painting (an eon ago) synthetic brushes have improved exponentially. Used to be that nothing beat Kolinsky, but now White Sable (synthetic hairs) will be my choice for watercolor.
Tomorrow I will be off to the art store to see what I can find.

Perhaps, somewhere there are mice raising their families cradled in the comfort of Russian sable.

Tools of the Trade

Out of the (figurative) mothballs I must drag my tools. Brushes, paints, support, cleaners, etc., etc. I have always been a tool freak and have more than I need. They have to be cleaned up and those no longer serviceable thrown out.
*Tip: For oils I have used paper (tearaway) palettes almost from the beginning of my art career - so much easier - but have recently discovered paper plates,the coated kind. Oh so much cheaper! Just use till they are covered with paint, then transfer paint that is left and toss the old plate.

Of course, if you insist on looking like the traditional artist then go back to that wooden, kidney shaped palette and waste time every time you have to clean it. To each his own!