Pages

Showing posts with label plein air. Show all posts

Wednesday, July 30, 2014

The Wild Life

I have never thought of plein air painting as particularly dangerous. Unless, perhaps, you twist an ankle while hiking to a prime spot. Or get drenched on an "iffy" weather day and wind up with a cold.

But last week a friend and I were painting just off a major road and had chosen a lovely stone bridge that crosses a small stream. We were quite proud of our spot. It had good subject matter, shade, and room for parking on the verge. In fact the only thing lacking was a bathroom (plenty of woods around, though).

As I focussed on my canvas, I saw movement out of the corner of my eye and looked up to see a black bear appear, sauntering off the bridge and heading my way! Not a baby bear, not a juvenile bear, but a big, full grown and very healthy looking adult black bear.

I said, in a low voice, "A bear…" and we started to back toward our cars. I reached into my bag to get my camera, but it was tangled up and wouldn't come out! The bear strolled forward a few steps, glanced our way, the turned (not speeding up or slowing down) and ambled into the woods on the other side of the road.

My camera finally came out of the bag and I turned and looked at Nancy. She had her phone out, ready to snap a pic, and said, "I didn't get one either. Nobody will believe us."

The rest of the day we painted while periodically looking over our shoulders!

Bear Bridge Off 611  9x12 oil on canvas


Tuesday, July 8, 2014

Plein Air with Friends

Nothing like getting outdoors with friends and doing what comes naturally - painting!

I roam around Bucks County at least two times a week, loaded up with painting gear, hunting for that perfect landscape. The fact is that a good artist can find a good painting no matter where they look, so spending time looking for the perfect composition is wasted time - time that could be spent painting.  One of the artist's jobs is to rearrange the elements of the scene to MAKE it a better composition.

Sometimes a good exercise is to close your eyes, turn around a few times then open them. Then, create your painting from whatever happens to be in front of you. Do it enough and it will get you out of the habit of seeking that ready-made landscape.

This week the Bucks County Plein Air Painters visited one of Bucks County's covered bridges. The Loux Bridge is unusual in that it is white rather than red as are most of the others. Constructed in 1874 of hemlock, it sits over Cabin Run Creek.

The weather was perfect! We parked ourselves on the side of the road and spent the morning painting. My friends worked in oil, but I decided to try a small watercolor. I was working on Arches 140 lb. paper and am fairly happy with the way it turned out.


"Loux Covered Bridge, Bucks County" 9x12 watercolor


Sunday, May 25, 2014

Wayne Plein Air

The show is over and the week in Wayne, PA painting in the Wayne Plein Air Festival was quite an experience!

Well organized and held in an area rich with subject matter, the only thing that didn't cooperate was the weather. We had rain off and on for all but two days and I discovered that I don't do my best work crammed into a car while the rain pours outside. You can't get any distance on your work!

The evening of the first day was an orientation of the area, with suggested properties to visit (owners had given permission to paint there). I spotted several roadside views, but parking like that is always a problem. Safety is a concern in that kind of situation.

The next two days were full of thunderstorms, but I still managed to create three paintings. Ridley State Park was where I settled after checking out a number of new areas.

Thursday was the only truly sunny day and I painted on the side of Darby Paoli Road, and spent most of the day at Androssan Farm. This is the last of the big estates in Radnor area and was used as the basis for the movie "Philadelphia Story" starring Katherine Hepburn, Cary Grant, and Jimmy Stewart. We had special permission to roam around the estate which is normally closed to the public. It will soon be broken up and sold off (so sad!).

Friday was a wash out…literally… as it poured rain all day. Streets were flooded and I took that time to do more framing.

By Saturday I was exhausted! That morning we were to paint in town. My effort was a real stinker, so I didn't even bother to turn it in.

The opening truly WAS "gala" with champaign, wine, a feast of dishes, and lots of sales. Approximately 180 artists applied, 31 were chosen, and they produced over 250 works of art! The paintings will stay up through July at the Wayne Art Center in Wayne, PA.

Oh! And I got and Honorable Mention!

Along Darby-Paoli Road   9x12   pastel on sanded paper

Monday, May 12, 2014

Heading out

This week I will be participating in the Wayne Plein Air art festival in Wayne, PA, and the first order of business is to cram everything I might need into something that is portable….and light enough that I can actually lift it. No small task.

So after stripping everything down to the bare essentials I have two bags. One for pastels and one for watercolors. I will pick which one I want to use at the beginning if each day and head out. I am rather proud of how small a space it takes up. Watercolor is on the left, Pastel on the right, and the tripod that I will use for both in its bag in the center.


Well….ok….It doesn't show the umbrella I will take for shade, or the wheely crate in case I have to do a lot of walking around town, or the folding chair (in case I want to sit down), or extra plastic bags in case it rains (which it is supposed to), or my big floppy hat, sunscreen, plastic poncho (rain again), rope and or bungie cords for tie downs, drawing and sketching materials, and a bag lunch and water, and first aid kit.


Oh yeah….I forgot about the framing materials. All paintings must be framed and ready for hanging before they are judged. So I must take frames, glass, mats, backing, and all tools it takes to put it all together on the spot.

I guess it's good that I drive an SUV………

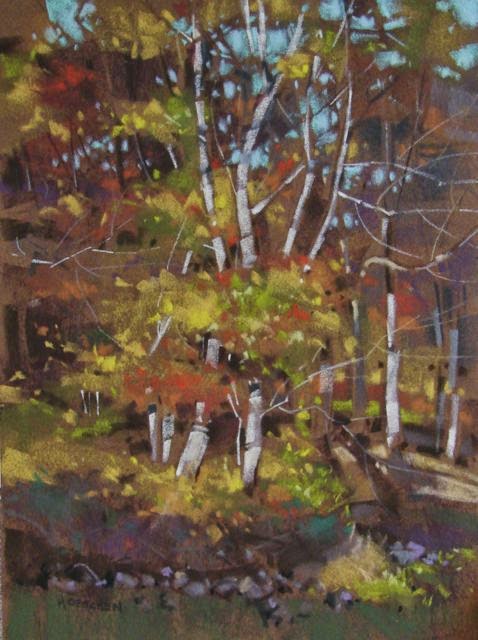
Here's the reason I go to all this trouble.

"Dancing Birches"    9x12     pastel on sanded paper


Friday, April 25, 2014

It sounded like a good idea at the time……..

One of the reasons I was interested in exploring pastel (aside from the fact that it was new to me) was because of my interest in plein air painting. And one of the things the plein air painter is always trying to do is to lighten the load. Since everything one uses must be carried, it behooves the artist to have as little equipment as possible.

With pastels, I thought, I can eliminate all the liquids that have to be carried with oils or watercolors. After all, fluids are heavy.

Silly me.

What I failed to take into account was the fact that by carrying only 5-6 tubes of color I can have full range of colors. But…… and this is a BIG BUT…….with pastels you must have dozens and dozens (even hundreds) of sticks, each a different color, in order to have a full range. And those sticks add up to a lot of weight.

And so it would seem to be a wash in the weight department. BUT……pastels are fast! Really fast! There is no drying time between layers of color or at the end, when you pack up.

So, I continue to explore pastels as a painting medium... and have started to exercise to build up some muscle……..


"Clear Day Today" 5x8  Just a sketch of a tree I see on my daily walk (exercise!).


Monday, August 15, 2011

Painting Turnagain Arm

Painted along Turnagain Arm today and was glad I didn't meet up with the black bear up the trail that several hikers encountered throughout the day. Lucky for all of us the bear turned tail whenever he saw anybody. I was in the same spot, morning through afternoon, and though I heard some noises I never actually saw the bear.
Several people stopped to watch me paint. All were courteous and encouraging.

Glorious weather, quiet painting time to myself. A good day!


Along Turnagain Arm they have some of the strongest and fastest bore tides ever.
Todays painting from the same spot as the photo.  9"x12"


Friday, July 8, 2011

Plein Air in Carversville

I and three friends from the workshop that I recently took traveled to Carversville, PA and we spent a morning and part of the afternoon painting and enjoying the out of doors. We stopped to eat lunch at the General Store and had such a pleasant day we are going back again next week.


First order of business, Gather up all the gear. Pochade box, paints, brushes, medium, tripod, chair (if I need it. I usually paint standing), dry carriers, and camera. What you don't see is my big hat and sunblock (essential!).

We met in town, scoped out the area, and found lots of painting material.


Streams and woods.


A stone bridge crossing the stream.


A heavily backlit red barn.

Ok,ok,.....I know everybody and his brother has painted a red barn. But, the building adds structure to the chaos of nature and I like the backlighting. Never tried that before.


So I painted it!

In 1 1/2 hours I gathered enough info to paint a larger work if I wanted to, and though the shapes are somewhat awkward, it was the light I was concerned with and I am happy with what I learned.


No, she's not doing a painting of the back of her car.

When you can find a spot where you can use the back of your car as a taboret it is luxury plein air! Having a hatchback works great, too.    *Tip:You can actually paint in the rain with canvas and paints in the back, while you stand under the hatchback door.....unless you are super tall.


Painting the back of the Carversville Inn.


The light on a stone bridge was dramatic.


   In the afternoon the bugs descended and all the Off! in the world couldn't keep them away, but all in all, not a bad day!!

Sunday, June 26, 2011

Workshop Week

Workshops are a wonderful way to immerse yourself in a learning experience and jump start enthusiasm. Being surrounded by like minded people can encourage a flagging ego and is a wealth of information as students share experiences and the instructor guides and critiques.

Bob Rohm demos at Cuttalossa Farm.
This past week I stepped out of my comfort zone (and isn't that part of attending a workshop?) and painted en plein air with Bucks County Art Workshops.  They offer an excellent variety of learning experiences and top notch international teachers. Jackie runs a tight ship and makes the painting experience a joy (Oh, those delicious lunches delivered to us each day...kiss Macario for me!).

Stone Ridge Farm B&B where Bucks County Art Workshops are held.
Bob Rohm was our fearless leader this week and led his small band to scenic spots each day where he would do a demo and then guide us as we worked. A great help to me was Bob's "Painterly Checklist" designed to make us aware of various compositional concerns (lightest light, darkest dark, most dynamic edge, etc.) Sometimes a painting simply isn't working, but we don't know why. This checklist can help.

I also threw caution to the wind by tossing aside my yellow ochre (my safety blanket for many years) and not toning my canvases before painting (hard to give up many years of tradition). Small changes, but for me big psychological humps to get over!


I generally avoid architecture of all kinds, trees are easier (who knows if a tree is crooked or not?), but decided to tackle the barn at Willoughby Farm.


Instructor came along and said "Stop! Don't do any more".  Thank you, Bob!
I have a tendency to keep painting until it is overdone, so it was good to have someone to put a stop to the overworking. Hopefully I will begin to employ some internal brakes from now on.


Pastels are something I haven't studied, so the demo Bob did at Stover Mill was especially fascinating to me. Building up careful layers of color was beautiful to watch. Watch out for poison ivy, though....

Friday was Critique Day and everyone put up their work for the week, to be seen and critiqued by the instructor. Critiques are a great way to learn as dozens of paintings are discussed and the instructor points out various aspects.  Good stuff!
Sheep shed at Cuttalossa Farm. Daniel Garber had his studio at Cuttalossa.
So I've already started saving my pennies and making plans. I'd like to do another workshop next year!

Sunday, June 19, 2011

Anticipation

Big day tomorrow. actually a big week! This week I am taking a painting workshop and am expecting an exciting week of new ideas and getting to rub shoulders with fellow artists.

I'm heading over to Bucks County Artists Workshops to take a plein air class where I am sure we will visit various scenic localities in upper Bucks County. Getting my gear ready and trying to make sure I don't forget anything, though I am sure that if I come up short on supplies some kindly fellow student will help out. Praying for good weather!

I'll be reporting on my progress....don't expect any masterpieces, though. That very seldom happens in a teaching situation. You're supposed to be learning and "stretching" yourself, stepping out of that comfort zone and trying something new. Hopefully the masterpieces (or at least the competent paintings) should come later.

Storm over Slifer Valley - 16 x 20   oil on canvas

Wednesday, June 15, 2011

Three S's for Plein Air

Frank LaLumia says that there are three S's to plein air painting: See it, Simplify it, State it.

See it: You must look beyond the beautiful elements and penetrate to the essence of the subject. Color and Value relationships between these elements are the foundation of your work. And you must translate a three dimensional world onto a two dimensional surface.

Simplify it: Keep the essential and eliminate the unnecessary. If you cram everything out there onto the canvas it will be chaotic and confusing. Decide what attracted you to the scene to begin with and emphasize that. Anything that doesn't support and enhance your idea can be eliminated. Here's where preliminary sketches are a help. Work out your ideas in a thumbnail sketch and you save a lot of time and paint.

State it: Millard Sheets said, "Don't search with your brush. State it!".  Decisions must be made all the time, but once decided, proceed with confidence. "State it" combines visual perception with technique. And because of the time factor in plein air painting, say it with as few strokes as possible.

I enjoy seeing the progression of the painting as an artist works, so here's something I just finished photographed at the halfway point and after finished.

Halfway through - this is painted on top of another, failed painting (I am ever frugal).


Finished painting - "Autumn Fields"   11 x 14


Thursday, June 2, 2011

Wonderful Day....Epic Fail!

 Visited Trexler Nature Preserve in Schnecksville, PA, the other day and had a glorious time tramping along their well maintained trails and taking photos for future reference. I will definately be going back!

There are miles and miles of hiking and horseback riding trails that offer unlimited scenery and are rated "easy", "moderate", and "hard" (this is so that I, a novice hiker, won't wander onto the wrong path and wind up missing for days as I try to crawl back to civilization along a trail nicknamed "Death March").

The weather was spectacular and I thoroughly enjoy my hours in the woods. I even stopped to do a quick little painting, but the results were less than stellar (hence the phrase "epic fail" in the title).

Trexler Nature Preserve in PA.

I parked myself on the edge of a field, dragged out all my gear and went to work.


Here's what I saw.

My set up. The pochade box is the one I made (instuctions here).

A quick blocking out of the shapes.

First lay in of color.

After one hour.

I set a deadline of one hour for myself because I have a tendency to pick at things and get too tight too soon. Choosing such a short time frame forces me to loosen up and cover more ground, faster.

But, after and hour I was very unhappy with what I had. In the distance I could see a couple of hikers coming up the trail, so rather than answer questions and try to justify a poor painting (not sure why I should care what they think, though), I just packed up and started back.

What went wrong? I think I had two main problems. I should have seen it then, but when you work outside you have to think on the fly and that is something that gets easier with practice.
Not enough value contrast : next time I will bring a medium that speeds drying. That way the colors will not sink into each other and I will be able to more easily show contrast.
Not enough color variation : green, green, and more green!! Yes, there really was a lot of green out there, but I should have used a little artistic license to change those colors and add interest and depth.

So that's my analysis. What do you think?


Thursday, May 26, 2011

En Plein Air

  This year I am exploring painting en plein air -"in the open air".

During the 19th century, when painting light became important to several schools of artists, there was a surge in the number of artists painting outdoors. Monet, Pissaro, Renoir, and other impressionists all advocated painting on the spot and the invention of tubed paints freed up artists from having to grind all their own pigments on the spot, causing an explosion in popularity. In America the plein air tradition is going strong and with new designs of portable easels and pochade boxes it is easier than ever to pack up your paints and head for the great outdoors. I made my own pochade box last month.


                                                           Painters painting painters painting outdoors.....huh?


But lest you think that all is sweetness and light, check out this hilarious (but so true) video made by a plein air artist during a painting excursion in the Sierra Nevada Mts http://blip.tv/lipking/adventures-in-plein-air-painting-1438969

Regardless of the mayhem that may result, I will be out there and writing about it in future posts.

Tuesday, May 24, 2011

The Quality of Light

After visiting Arizona a little while ago, I now know why some artists so love painting out west. I could never understand it before. It's so barren, fewer and smaller trees, and the cool, blue-green mountains I  love are seldom to be found in the rocky landscape.

But there is something about the light. 

Perhaps because of the lack of moisture in the air, the skies seem bluer, the air clean and sharp. The boundaries between objects are clean and sharp, too. And you can see for miles! That light quality is beautiful to paint and opens up sharp colors and clear contrasts to the artist's eyes. I love it, too, now!

Thumb Butte Trail    11" x 14"

Thursday, April 14, 2011

How to Make a Plein Air Pochade Box

Many say that there is nothing like the immediacy of painting en plein air ( outside, in the open). So, I'm gonna try it! I have painted outdoors a few times, but this year as I work to get my painting skills back I'm going to spice it up by packing up and heading out into the great outdoors on a regular basis.

Okay, okay...... so maybe at first I am just going to walk down the road a bit, but still, it IS outside.

First I need the proper equipment and that means a pochade box. A pochade box is a paintbox that is an easel, palette, and canvas carrier all rolled into one. Traditional pochades boxes are much smaller than a french easel.

OMG!! I went online and those suckers average $150 -$350 !!!  Take a look at these pochades.
Beautiful, but I can't afford them.

So, I've decided to gather up supplies and make my own. Won't be nearly as nice, but if it's functional that's  what I need.

Step 1: I'm off to Michaels with a 40% Off Coupon to buy a simple, light wooden box. 

Here's what I wound up with. It measures 9" x 12" x 3 1/2"(outside dimensions) and is unfinished.

Not very rugged....yet!


I rubbed in three coats of boiled linseed oil to help protect the wood.


Step 2: Add wood slats to make a "shelf".


I glued two slats, shorter than the depth, to each side so that I could later sit a tray on top of them. The slats will keep the tray from touching the bottom, which will be serving as my palette. I don't have to scrape my palette when done. I just close everything up and walk away.


Step 3: Replace the hinges.
 

The hinges were flimsy things, so the next thing I did was buy three sturdy hinges and add them to what was there. The old hinges weren't even screwed in, they were just punched in like big staples.


Step 4: Create the palette area.

I cut a piece of plexiglas and piece of white watercolor paper the size to fit exactly into the bottom (hard to see the plexi in the photo).

Then I cut plexiglas for each side, the height of the shelf.


The white paper goes into the bottom, then the plexiglas goes on top. Then I set each of the side pieces in it's spot.

Now the secret: I ran silicon aquarium sealant around all the seams to make it waterproof and hold it in place. Now I can squeeze out my oil paints directly into the bottom of the box, use it as a palette, and clean the center with the wipe of a cloth! But you can leave the paint that you squeezed out around the edges.


Step 5: Now, off to the hardware store for latches (one for each side) and a hinge to hold the lid in position so that I can lean a canvas against it. Also nuts bolts and washers to attach the handle.


The screws that came with the latches poked through the wood on the inside, so I will use my trusty Dremel with a cutting tool to cut the points off.


Step 6: Create a handle of some sort. Hmmmmmn.....what do I have lying around?

I took a flat, nylon dog leash, cut it to size (melt the cut edges so they won't unravel) and fold the ends under about an inch.

With my Dad's old soldering iron I melted a hole through the nylon at both ends and after drilling a couple of holes through the box, I used nuts, bolts, and washers to attach the strap to the box (the washers distribute the pressure and make it less likely to pull through).

Step 7: Make a tray.
Using foam core (carefully cut), glue (I used E-600), and some white duct tape for waterproofing I make a tray to hold supplies and cover the palette area beneath. We used to make things out of foam core all the time in my college art classes.

The only thing I am missing is the hinge (store didn't have the right size), so that the back lid can be used to lean my canvas against. I'll get that next time I'm out.


Finished!


And I'm so happy with the way it turned out I may make another for my watercolors!

Box (main expense), hardware, sealant, plexiglas, etc. all wound up costing about $35.