 |
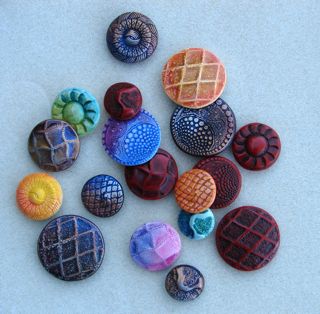
| A small sample from my latest Button Binge |
But, from these buttons I can make molds and create more buttons and cabs for my jewelry designs, and in whatever color I want! Super Sculpey works great for this (it is finely ground to create the finest details), but more often I simply save all my bits and pieces of scrap clay, condition them together and use the result for molds. Works great and costs nothing.
And it doesn't have to be only buttons you make. It can be cabochons, faces (click here to see How to Shape a Face), any texture you want to capture and reproduce.

Take the clay you have chosen, thoroughly condition it, and roll it into a ball. Place it on your working surface. I like to use a plain tile since all I have to do when I am done is slip it into the oven (no transferring of clay needed).

Use something flat, like another tile or the backside of a rubber stamp, to flatten it sightly.

Dust your chosen button with a little cornstarch, so that it won't be too hard to get it to release. You can also use water or baby powder. Then, carefully press the button into the clay. Try to keep it level.

Gently lift the button straight up. The more complicated or deep the texture, the more difficult it will be to get the button to release. You may need to rock it back and forth a little to get it started. Too much movement, back and forth, may distort the mold, but I have actually pushed things back into shape afterwards. If it doesn't work, though, all you need to do is wad the clay up, roll it into a ball, and start over. No problem!

Bake the clay according to the manufacturer's instructions.
Here are a series of molds made from the buttons above.

Dust the mold with cornstarch. Condition the clay you intend to use and press it into the mold. Use enough clay so that the top sits a little above the edges (if it is level it's a lot harder to get out). If you want a shank, you can press a jump ring or spring ring into the clay. I like to drop a little Liquid Sculpey into the space created by pressing it into the clay to make sure it doesn't pull out after baking.
Gently pry it out of the mold by working from the edges to the center. If it gets a little distorted you may be able to carefully push it back into shape. Place it on a bed of polyester (like quilt batting).
Bake according to manufacturer's directions. Voila'! New buttons!
*Tip: Always preheat the oven before you put the clay in to bake. If you place it in a cold oven and then turn it on, the polyester will melt and burn.
 |
| Some of the polymer clay buttons made from the polymer clay molds. |
No comments:
Post a Comment