Pages

Thursday, March 31, 2011

First Painting Finished

Click here to see how I started this painting......

Another pass, sharpening focus, making some design decisions. Pulled some blue from the sky down into the house so the painting is more integrated. Added more color variations in the foreground, but still keeping it loose.


I set it aside for a while to think about it. Decided to raise the horizon line on the right because everything looked like it was sliding off the picture plane, then painted in a few more details. I have to be careful because I have a tendency to want to render everything to death. If left to my own devices I will pick at a painting till it looks like a photo (And why do that? It's easier to use a camera). So my goal is to keep it loose and suggested.


But, did I succeed?


Wednesday, March 30, 2011

Start Painting!

Alright! I'm visually pumped up by perusing my books. I've sharpened my hand/eye coordination by sketching. So it's time to get started.


OK.

There it is. The blank canvas (it's so clean, so white).

Let's get started............(almost pristine).

Go ahead. Just do it!


SO, MAKE A MARK ALREADY!!!!!


Dang! Still stuck.
So, the final thing I do to overcome " white page syndrome" is tone the canvas. After that it is no longer so intimidating!

A wash of venetian red.


Now I can move forward.

I quickly sketch in the major elements with more venetian red.

Check out "Inertia 2" (earlier post) to see the sketch I am working from.


1st pass:

With thin washes of color I block in shapes, just to establish composition and get an idea of the balance of values and color. It's easy to alter anything you want at this point.
Everything is in flux and subject to change.

I keep stepping back so that I can see the whole thing at a glance. It is a small canvas (11 x14), so I don't have to step back very far. This is so I don't get caught up in one small area and forget about the rest.


2nd pass:

Another thin wash adding more color, emphasizing  some darks, intensifying some of the colors.

Still very much in flux, but getting more solid.


I'm working in oil, which takes a long time to dry. To counter this I can use any number of additives that are on the market to speed drying. But at this point the painting is so wet that any more paint I add just sinks into the paint below it, dulling the color. So I'm going to stop here and let it dry a bit overnight. By tomorrow it will be tacky and I can add paint that will retain its color saturation. Till tomorrow.......

*Tip: To make things go faster you can lay an acrylic wash on, to tone the blank canvas. It will dry much faster than an oil wash, and it is OK to paint oil on top of the acrylic. It is NOT alright to paint acrylic on top of oil. This is called the "Fat over Lean" law.

Monday, March 28, 2011

How to Make Molds

No, no. Not the kind you find in my basement. I'm talking about a mold made of polymer clay from which you can create multiples. It's so easy!!
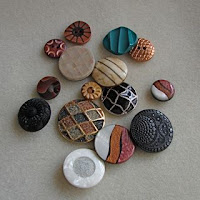
A small sample from my latest Button Binge
I went a little crazy when I went to a buttons and trims store  and bought a sinful number of buttons........gorgeous buttons.

But, from these buttons I can make molds and create more buttons and cabs for my jewelry designs, and in whatever color I want! Super Sculpey works great for this (it is finely ground to create the finest details), but more often I simply save all my bits and pieces of scrap clay, condition them together and use the result for molds. Works great and costs nothing.

And it doesn't have to be only buttons you make. It can be cabochons, faces (click here to see How to Shape a Face), any texture you want to capture and reproduce.


Take the clay you have chosen, thoroughly condition it, and roll it into a ball. Place it on your working surface. I like to use a plain tile since all I have to do when I am done is slip it into the oven (no transferring of clay needed).


Use something flat, like another tile or the backside of a rubber stamp, to flatten it sightly.


Dust your chosen button with a little cornstarch, so that it won't be too hard to get it to release. You can also use water or baby powder. Then, carefully press the button into the clay. Try to keep it level.


Gently lift the button straight up. The more complicated or deep the texture,  the more difficult it will be to get the button to release. You may need to rock it back and forth a little to get it started. Too much movement, back and forth, may distort the mold, but I have actually pushed things back into shape afterwards. If it doesn't work, though, all you need to do is wad the clay up, roll it into a ball, and start over. No problem!


Bake the clay according to the manufacturer's instructions.


Here are a series of molds made from the buttons above.


Now make the button:
Dust the mold with cornstarch. Condition the clay you intend to use and press it into the mold. Use enough clay so that the top sits a little above the edges (if it is level it's a lot harder to get out). If you want a shank, you can press a jump ring or spring ring into the clay. I like to drop a little Liquid Sculpey into the space created by pressing it into the clay to make sure it doesn't pull out after baking.
Gently pry it out of the mold by working from the edges to the center. If it gets a little distorted you may be able to carefully push it back into shape. Place it on a bed of polyester (like quilt batting).
Bake according to manufacturer's directions.  Voila'! New buttons!

*Tip: Always preheat the oven before you put the clay in to bake. If you place it in a cold oven and then turn it on, the polyester will melt and burn.
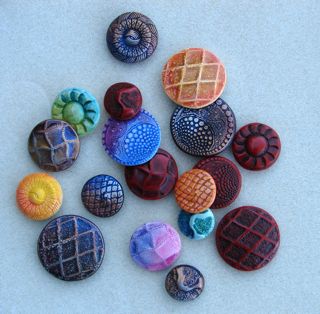

Some of the polymer clay buttons made from the polymer clay molds.

Saturday, March 26, 2011

Inertia 2


Another way to overcome inertia is sketching (this winds up killing two birds with one stone since you can also use the sketches as a basis for paintings later on).

The blank page of the sketchbook is not so scary as the blank canvas because it seems much easier to rip out the page and throw it away if it is too hideous. Nobody will ever know! You can throw out canvasses, too, but they cost a lot more. OK, so I'm cheap.

I carry my camera everywhere, so I can later use photos to sketch from if it is inconvenient sketch on the spot. Just don't get enslaved to the photographic image (this is always a danger). The camera distorts the image too, and the camera's view is no more valid than yours. Again, the photo should only be a starting point from which you branch out. Don't be afraid to experiment!
From my sketchbook:


 I often note where the sketch was done (heaven help me if I have to rely on my memory!)


Friday, March 25, 2011

Inertia

How do you overcome the inertia that seems to grip so many artists when faced with a blank canvas?

For me it can even start before I drag out my tools. I want to get to work, but my brain is out of gear. How to slip it back into the groove?

One of the easiest ways for me is to delve into my treasure trove of books and begin to flip through. To a visual artist the photos are like a feast!
The colors and compositions will stimulate those creative juices and you will begin to get ideas.
But, beware! I am NOT talking about copying or imitating the works you are studying. Imitation may be a sincere form of flattery, but it also can stunt your growth (and can be illegal to boot!).
Favorite works are jumping off points for your own artwork. Some small part of a painting may send your creativity off into a whole new direction.
I gravitate toward works that display the same artistic concerns that I have and share many of the same characteristics.


Some artworks from my gazzillion books that get me goin'!


Components of Art: Form - the organization (design) of all elements which make up a work of art. Elements of form are line, shapes, values, textures, and colors.The one that grabs me fastest is color.

Wednesday, March 23, 2011

Macrame Day

I'll be teaching this macrame bracelet at a bead retreat next month and will have to remake it since the original has "walked off" and is nowhere to be found.

I must gather materials and tools, make the bracelet while photographing each step for the instructions I will hand out, and complete it. The photos must be cropped and adjusted. Then I have to write the instructions, insert the photos, and recheck everything.

Macrame tutorials are (I think) difficult to write since a sentence can be interpreted in so many different ways. That's where photos come in, lots of photos. I learn better from photos and diagrams (most of the time I don't even read the text) and so when I write instructions I hit both the written word and the visual picture.


Here are two more macrame projects that can be done with several basic knots. For a Macrame Tutorial on basic knots you can click  here.


Tuesday, March 22, 2011

Goodbye Kolinsky Sables

Disaster strikes!

My expensive sable watercolor brushes, that I scraped and saved so long to buy, are dust. Who would have thought that I really SHOULD have put mothballs in with them. Or maybe it was mice.
Anyway, when I picked them up (memories washing over me) the hairs disintegrated and I was left holding a bunch of metal tipped sticks!
Since I began painting (an eon ago) synthetic brushes have improved exponentially. Used to be that nothing beat Kolinsky, but now White Sable (synthetic hairs) will be my choice for watercolor.
Tomorrow I will be off to the art store to see what I can find.

Perhaps, somewhere there are mice raising their families cradled in the comfort of Russian sable.

Tools of the Trade

Out of the (figurative) mothballs I must drag my tools. Brushes, paints, support, cleaners, etc., etc. I have always been a tool freak and have more than I need. They have to be cleaned up and those no longer serviceable thrown out.
*Tip: For oils I have used paper (tearaway) palettes almost from the beginning of my art career - so much easier - but have recently discovered paper plates,the coated kind. Oh so much cheaper! Just use till they are covered with paint, then transfer paint that is left and toss the old plate.

Of course, if you insist on looking like the traditional artist then go back to that wooden, kidney shaped palette and waste time every time you have to clean it. To each his own!

Polymer possibilities


Love the look of old!

Artifact Pendant
Components of Art: Subject Matter - not always deep and symbolic. Sometimes a tree is just a tree. Especially with me.

Monday, March 21, 2011

Blog Challenged

A fruitless day hunting for the book "Google Blogger for Dummies".
Guess I will have to wing it, or buy it online from Amazon. It is so much easier to let someone else go through all the pain of learning a technique, and then let them tell you what works and what doesn't. That's why people take classes!
I always point this out to my beading students when they get frustrated. They can benefit from all my experimentation and mistakes rather than having to stumble onto the correct technique after many failures. Click here for a list of classes I will be teaching for 2011.

Views!??

Views? How can I have views? I haven't even gotten started yet!

You must give me time to come up with something wise, or interesting, or quirky, or something. Give me another day to take some pictures.
Out of all the gazillions of blogs out there how did you people find mine so fast? Probably spiders and crawlers......

Learn Something New!

I will be working on this new blog for the next few days (Oh! the learning curve). After that I hope I will have something to say!